
Transitions
View states let you change the appearance of an application, typically in response to a user action. Transitions define how a change of view state looks as it occurs on the screen. You define a transition by using the effect classes, in combination with several effects designed explicitly for handling transitions.
To use transitions, you should be familiar with how effects and view states work. For more information on effects, see Introduction to effects. For more information on view states, see View states.
About transitions
View states let you vary the content and appearance of an application, typically in response to a user action. To use view states, you define the default view state of an application, and one or more additional view states.
When you change view states, Flex performs all the visual changes to the application at the same time. That means when you resize, move, or in some other way alter the appearance of the application, the application appears to jump from one view state to the next.
Instead, you might want to define a smooth visual change from one view state to the next, in which the change occurs over a period of time. A transition is one or more effects grouped together to play when a view state change occurs.
For example, your application defines a form that in its default view state shows only a few fields, but in an expanded view state shows additional fields. Rather than jumping from the base version of the form to the expanded version, you define a transition that uses the Resize effect to expand the form, and then uses the Fade effect to slowly make the new form elements appear on the screen.
When a user changes back to the base version of the form, your transition uses a Fade effect to make the fields of the expanded form disappear, and then uses the Resize effect to slowly shrink the form back to its original size.
By using a transition, you can apply one or more effects to the form, to the fields added to the form, and to fields removed from the form. You can apply the same effects to each form field, or apply different effects. You can also define one set of effects to play when you change state to the expanded form, and a different set of effects to play when changing from the expanded state back to the base state.
Example: Using transitions with a login form
The topic View states contains an example of a login form with two states: a base state and a register state. The following example adds a transition to this form to use a Wipe effect and a Resize effect with an easing function to animate the transition from view state to view state:
<?xml version="1.0" ?>
<!-- transitions\LoginFormTransition.mxml -->
<s:Application xmlns:fx="http://ns.adobe.com/mxml/2009"
    xmlns:mx="library://ns.adobe.com/flex/mx"
    xmlns:s="library://ns.adobe.com/flex/spark">

    <!-- The Application class states property defines the view states.-->
    <s:states>
        <s:State name="default"/>
        <s:State name="Register"/>
    </s:states>

    <!-- Define the transition to animate the change of view state. -->
    <s:transitions>
       <s:Transition fromState="default">
            <s:Parallel>
                <s:Wipe direction="right" target="{confirm}"/>
                <s:Resize target="{loginPanel}" duration="100"/>
            </s:Parallel>
        </s:Transition>
       <s:Transition fromState="Register">
            <s:Sequence>
                <s:Resize target="{loginPanel}" duration="100"/>
            </s:Sequence>
        </s:Transition>
    </s:transitions>

    <!-- Set title of the Panel container based on the view state.-->
    <s:Panel id="loginPanel"
        title="Login" title.Register="Register">
        <s:layout>
            <s:VerticalLayout/>
        </s:layout>
        <s:Form id="loginForm">
            <s:FormItem label="Username:">
                <s:TextInput/>
            </s:FormItem>
            <s:FormItem label="Password:">
                <s:TextInput/>
            </s:FormItem>
            <!-- Add a TextInput control to the form for the Register view state. -->
            <s:FormItem id="confirm" label="Confirm:" includeIn="Register">
                <s:TextInput id="myTI"/>
            </s:FormItem>
            <s:FormItem>
                <!-- Use the LinkButton to change to the Register view state.-->
                <!-- Exclude the LinkButton from the Register view state.-->
                <!-- Add a LinkButton to the form for the Register view state. -->
                <mx:LinkButton label="Return to Login"
                    includeIn="Register"
                    click="currentState=''"/>
                <mx:LinkButton id="registerLink"
                    includeIn="default"
                    label="Need to Register?"
                    click="currentState='Register'"/>
                <s:Button id="loginButton"
                    label="Login" label.Register="Register"/>
            </s:FormItem>
        </s:Form>
    </s:Panel>
</s:Application>
Comparing transitions to effects
Transitions do not replace effects; that is, you can still apply a single effect to a component. Transitions give you the ability to group multiple effects so that the effects are triggered together as part of a change of view states. Transitions are designed to work specifically with a change between view states, because a view state change typically means multiple components are modified at the same time.
Transitions also support effect filters. A filter lets you conditionalize an effect so that it plays an effect only when the effect target changes in a certain way. For example, as part of the change to the view state, one or more components may change size. You can use a filter with an effect so that you apply the effect only to the components being resized. For an example using a filter, see Filtering effects.
Defining transitions
You use the Transition class to create a transition. The following table defines the properties of the Transition class:
|
Property |
Definition |
|---|---|
fromState |
A String that specifies the view state that you are changing from when you apply the transition. The default value is an asterisk, "*", which means any view state. |
toState |
A String that specifies the view state that you are changing to when you apply the transition. The default value is an asterisk, "*", which means any view state. |
effect |
The Effect object to play when you apply the transition. Typically, this is a composite effect, such as the Parallel or Sequence effect, that contains multiple effects. |
You can define multiple Transition objects in an application. The UIComponent class includes a transitions property that you set to an Array of Transition objects. For example, you define an application with three Panel containers and three view states, as the following example shows:
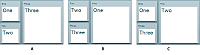
- A.
- Default view state
- B.
- One view state
- C.
- Two view state
You define the transitions for this example in MXML using the <s:transitions> tag, as the following example shows:
<?xml version="1.0" ?>
<!-- transitions/DefiningTrans.mxml -->
<s:Application xmlns:fx="http://ns.adobe.com/mxml/2009"
    xmlns:mx="library://ns.adobe.com/flex/mx"
    xmlns:s="library://ns.adobe.com/flex/spark" width="400" >

    <!-- Define the two view states, in addition to the base state.-->
    <s:states>
        <s:State name="default"/>
        <s:State name="One"/>
        <s:State name="Two"/>
    </s:states>

    <!-- Define Transition array with one Transition object.-->
    <s:transitions>
        <!-- A transition for changing from any state to any state. -->
        <s:Transition id="myTransition" fromState="*" toState="*">
            <!-- Define a Parallel effect as the top-level effect.-->
            <s:Parallel id="t1" targets="{[p1,p2,p3]}">
                <!-- Define a Move and Resize effect.-->
                <s:Move  duration="400"/>
                <s:Resize duration="400"/>
            </s:Parallel>
        </s:Transition>
    </s:transitions>

    <!-- Define the container holding the three Panel containers.-->
    <s:Group id="pm" width="100%" height="100%">
        <s:Panel id="p1" title="One"
                x="0" y="0"
                x.One="110" y.One="0"
                x.Two="0" y.Two="0"
                width="100" height="100"
                width.One="200" height.One="210"
                width.Two="100" height.Two="100"
                click="currentState='One'">
            <s:Label fontSize="24" text="One"/>
        </s:Panel>

        <s:Panel id="p2" title="Two"
                x="0" y="110"
                x.One="0" y.One="0"
                x.Two="110" y.Two="0"
                width="100" height="100"
                width.One="100" height.One="100"
                width.Two="200" height.Two="210"
                click="currentState='Two'">
            <s:Label fontSize="24" text="Two"/>
        </s:Panel>

        <s:Panel id="p3" title="Three"
                x="110" y="0"
                x.One="0" y.One="110"
                x.Two="0" y.Two="110"
                width="200" height="210"
                width.One="100" height.One="100"
                width.Two="100" height.Two="100"
                click="currentState='default'">
            <s:Label fontSize="24" text="Three"/>
        </s:Panel>
    </s:Group>
</s:Application>
In this example:
-
You use the click event of each Panel container to change the view state.
-
When the application changes view state, Flex searches for a Transition object that matches the current and destination view state. In this example, you set the fromState and toState properties to "*". Therefore, Flex applies myTransition to all state changes. For more information on setting the fromState and toState properties, see Defining multiple transitions.
-
After Flex determines the transition that matches the change of view state, Flex applies the effects defined by the transition to the effect targets. In this example, you use the specification of the top-level Parallel effect in the transition to specify the targets as the three Panel containers. For more information on setting the effect targets, see Defining effect targets.
The effects play in parallel on all effect targets, so the three Panel containers move to a new position and change size simultaneously. You can also define the top-level effect as a Sequence effect to make the effects occur sequentially, rather than in parallel.
Flex determines the start and end property values of the Move and Resize effect by using information from any properties that you specified to the effect, the current view state, and the destination view state. In this example, you omit any property specifications in the effect definitions, so Flex uses the current size and position of each Panel container to determine the values of the Move.xFrom, Move.yFrom, Resize.widthFrom, and Resize.heightFrom properties. Flex uses the destination view state to determine the values of the Move.xTo, Move.yTo, Resize.widthTo, and Resize.heightTo properties. For more information, see Defining the effect start and end values.
Defining multiple transitions
You can define multiple transitions in your application so that you can associate a specific transition with a specific change to the view state. To specify the transition associated with a change to the view states, you use the fromState and toState properties.
By default, both the fromState and toState properties are set to "*", which indicates that the transition should be applied to any changes in the view state. You can set either property to an empty string, "", which corresponds to the default view state.
You use the fromState property to explicitly specify the view state that your are changing from, and the toState property to explicitly specify the view state that you are changing to, as the following example shows:
 <s:transitions>
 	<!-- Play for a change to the login view state from any view state. -->
 	<s:Transition id="toLoginFromAny" fromState="*" toState="login">
 		...
 	</s:Transition>

 	<!-- Play for a change to the login view state from 		the details view state. -->
 	<s:Transition id="toLoginFromDetails" 		fromState="details" toState="login">
 		...
 	</s:Transition>

 	<!-- Play for a change from any view state to any other view state. -->
 	<s:Transition id="toAnyFromAny" fromState="*" toState="*">
 		...
 	</s:Transition>
 </s:transitions>

 <!-- Go to the login view state, transition toLoginFromAny plays. -->
 <s:Button click="currentState="login";/>

 <!-- Go to the details view state, transition toAnyFromAny plays. -->
 <s:Button click="currentState="details";/>

 <!-- Go to the login view state, transition toLoginFromDetails plays because you transitioned from the details to the login view state. -->
 <s:Button click="currentState="login";/>

 <!-- Go to the default view state, transition toAnyFromAny plays. -->
 <s:Button click="currentState='';/>
If a state change matches two transitions, the toState property takes precedence over the fromState property. If more than one transition matches, Flex uses the first matching definition detected in the transition Array.
Defining effect targets
The <s:Transition> tag shown in the section Defining transitions defines the effects that make up a transition. The top-level effect defines the target components of the effects in the transition when the effect does not explicitly define a target. In that example, the transition is performed on all three Panel containers in the application. If you want the transition to play only on the first two panels, you define the Parallel effects as the following example shows:
 <s:Transition fromState="*" toState="*">
 	<!-- Define a Parallel effect as the top most effect.-->
 	<s:Parallel id="t1" targets="{[p1,p2]}">
 		<s:Move duration="400"/>
 		<s:Resize duration="400"/>
 	</s:Parallel>
 </s:Transition>
You removed the third panel from the transition, so it is no longer a target of the Move and Resize effects. Therefore, the third panel appears to jump to its new position and size during the change in view state. The other two panels show a smooth change in size and position for the 400-millisecond (ms) duration of the effects.
You can also use the target or targets properties of the effects within the transition to explicitly specify the effect target, as the following example shows:
 <s:Parallel id="t1" targets="{[p1,p2,p3]}">
 	<s:Move targets="{[p1,p2]}" duration="400"/>
 	<s:Resize duration="400"/>
 </s:Parallel>
In this example, the Resize effect plays on all three panels, while the Move effect plays only on the first two panels. You could also write this example as the following code shows:
 <s:Parallel id="t1" targets="{[p1,p2]}">
 	<s:Move duration="400"/>
 	<s:Resize targets="{[p1,p2,p3]}" duration="400"/>
 </s:Parallel>
Defining the effect start and end values
Like any effect, an effect within a transition has properties that you use to configure it. For example, most effects have properties that define starting and ending information for the target component, such as the xFrom, yFrom, xTo, and yTo properties of the Move effect.
Effects defined in a transition must determine their property values for the effect to execute. Flex uses the following rules to determine the start and end values of effect properties of a transition:
-
If the effect explicitly defines the values of any properties, use them in the transition, as the following example shows:
 <s:Transition fromState="*" toState="*">
 	<s:Sequence id="t1" targets="{[p1,p2,p3]}">
 		<mx:Blur duration="100" blurXFrom="0.0" blurXTo="10.0"
			blurYFrom="0.0" 			blurYTo="10.0"/>
 	 <s:Parallel>
 			<s:Move duration="400"/>
 			<s:Resize duration="400"/>
 		</s:Parallel>
 	 <mx:Blur duration="100" blurXFrom="10.0" blurXTo="0.0"
		blurYFrom="10.0" 			blurYTo="0.0"/>
 	</s:Sequence>
 </s:Transition>
In this example, the two Blur filters explicitly define the properties of the effect.
-
If the effect does not explicitly define the start values of the effect, Flex determines them from the current settings of the target component, as defined by the current view state.
In the example in rule 1, notice that the Move and Resize effects do not define start values. Therefore, Flex determines them from the current size and position of the effect targets in the current view state.
-
If the effect does not explicitly define the end values of the effect, Flex determines them from the settings of the target component in the destination view state.
In the example in rule 1, the Move and Resize effects determine the end values from the size and position of the effect targets in the destination view state. In some cases, the destination view state explicitly defines these values. If the destination view state does not define the values, Flex determines them from the settings of the default view state.
-
If there are no explicit values, and Flex cannot determine values from the current or destination view states, the effect uses its default property values.
The following example modifies the three-panel example shown in Defining transitions by adding Blur effects to the transition, where the Blur effect explicitly defines the values of the blurXFrom, blurXTo, blurYFrom, and blurYTo properties:
<?xml version="1.0" ?>
<!-- transitions\DefiningTransWithBlurs.mxml -->
<s:Application xmlns:fx="http://ns.adobe.com/mxml/2009"
    xmlns:mx="library://ns.adobe.com/flex/mx"
    xmlns:s="library://ns.adobe.com/flex/spark" width="400" >

    <!-- Define the two view states, in addition to the base state.-->
    <s:states>
        <s:State name="default"/>
        <s:State name="One"/>
        <s:State name="Two"/>
    </s:states>

    <!-- Define the single transition for all view state changes.-->
    <s:transitions>
        <s:Transition fromState="*" toState="*">
            <s:Sequence id="t1" targets="{[p1,p2,p3]}">
                <mx:Blur duration="100" blurXFrom="0.0" blurXTo="10.0"
                blurYFrom="0.0" blurYTo="10.0"/>
                <s:Parallel>
                    <mx:Move  duration="400"/>
                    <mx:Resize duration="400"/>
                </s:Parallel>
                <mx:Blur duration="100" blurXFrom="10.0" blurXTo="0.0"
                blurYFrom="10.0" blurYTo="0.0"/>
            </s:Sequence>
        </s:Transition>
    </s:transitions>

    <!-- Define the container holding the three Panel containers.-->
    <s:Group id="pm" width="100%" height="100%">
        <s:Panel id="p1" title="One"
                x="0" y="0"
                x.One="110" y.One="0"
                x.Two="0" y.Two="0"
                width="100" height="100"
                width.One="200" height.One="210"
                width.Two="100" height.Two="100"
                click="currentState='One'">
            <mx:Label fontSize="24" text="One"/>
        </s:Panel>

        <s:Panel id="p2" title="Two"
                x="0" y="110"
                x.One="0" y.One="0"
                x.Two="110" y.Two="0"
                width="100" height="100"
                width.One="100" height.One="100"
                width.Two="200" height.Two="210"
                click="currentState='Two'">
            <mx:Label fontSize="24" text="Two"/>
        </s:Panel>

        <s:Panel id="p3" title="Three"
                x="110" y="0"
                x.One="0" y.One="110"
                x.Two="0" y.Two="110"
                width="200" height="210"
                width.One="100" height.One="100"
                width.Two="100" height.Two="100"
                click="currentState='default'">
            <mx:Label fontSize="24" text="Three"/>
        </s:Panel>
    </s:Group>
</s:Application>
Interrupting and reversing a transition
Flex does not support the playing of multiple transitions simultaneously. If a transition is currently playing when a new transition occurs, by default the currently playing transition stops by calling the end() method on all effects in the transition.
For example, a transition is playing between view states A and B. While it is playing, a transition is triggered because of a change from view state B to view state C. The end() method causes the current transition, from view state A to B, to snap to the B view state. The new transition, from view state B to C, then starts playing.
Use the Transition.interruptionBehavior property of the new transition to control the behavior of the current transition. By default, the interruptionBehavior property is set to end to specify that the current transition snaps to its end view state. Set the interruptionBehavior property of the new transition to stop to halt that current transition instead. The new transition then plays from the halt location in the current transition, rather than having the current transition snap to its end view state. The value of stop can smooth out the appearance of an interrupted transition. That is because the user does not see the current transition snap to its end state before the new transition begins.
In some cases, the new transition is the reverse of the current transition. For example, a transition is playing between view states A and B. While it is playing, a transition is triggered to change back from view state B to A.
-
Defines two transitions. Define one transition for the change from view state A to view state B, and one for the change from B to A. Use the toState and fromState properties of the Transition class to specify the view states for the two transitions, as shown below:
 <s:transitions>
 	<s:Transition id="fromAtoB" fromState="A" toState="B">
		...
 	</s:Transition>

 	<s:Transition id="fromBtoA" fromState="B" toState="A">
		...
 	</s:Transition>
 </s:transitions>
The interruptionBehavior property controls the behavior of the current transition when the reverse transition starts playing.
-
Define a single transition. Set the autoReverse property of the Transition class to true to specify that this transition applies to both the forward and reverse view state changes. Therefore, use this transition on a change from view state A to view state B, and on the change from B to A.
 <s:transitions>
 	<s:Transition id="fromAtoBtoA" fromState="A" toState="B" autoReverse="true">
		...
 </s:transitions>
Note: If a transition uses the toState and fromState properties to explicitly handle the transition from view state B to A, then Flex ignores the autoReverse property.While the transition from view state A to view state B is playing, the reverse transition can occur to interrupt the current transition. The reverse transition always halts the current transition at its current location. That is, the reverse transition always plays as if the interruptionBehavior property was set to stop, regardless of the real value of interruptionBehavior.
Handling events when using transitions
You can handle view state events, such as currentStateChange and currentStateChanging, as part of an application that defines transitions. Changes to the view state, dispatching events, and playing transition effects occur in the following order:
-
You set the currentState property to the destination view state.
-
Flex dispatches the currentStateChanging event.
-
Flex examines the list of transitions to determine the one that matches the change of the view state.
-
Flex examines the components to determine the start values of any effects.
-
Flex applies the destination view state to the application.
-
Flex dispatches the currentStateChange event.
-
Flex plays the effects that you defined in the transition.
If you change state again while a transition plays, Flex jumps to the end of the transition before starting any transition associated with the new change of view state.
Using action effects in a transition
In the following example, you define an application that has two view states:
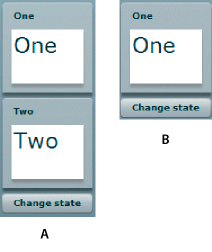
- A.
- Default view state
- B.
- OneOnly view state
To move from the default view state to the OneOnly view state, you create the following view state definition:
 <s:states>
	<s:State name="default"/>
 	<s:State name="OneOnly"/>
</s:states>
To move from the default view state to the OneOnly view state, you set the value of the visible and includeInLayout properties to false so that Flex makes the second Panel container invisible and ignores it when laying out the application. If the visible property is false, and the includeInLayout property is true, the container is invisible, but Flex lays out the application as if the component were visible.
A view state defines how to change states, and the transition defines the order in which the visual changes occur. In the example shown in the previous image, you play an Wipe effect on the second panel when it disappears, and when it reappears on a transition back to the base state.
For the change from the base state to the OneOnly state, you define the toOneOnly transition which uses the Wipe effect to make the second panel disappear, and then sets the panel's visible and includeInLayout properties to false. For a transition back to the base state, you define the toAnyFromAny transition that makes the second panel visible by setting its visible and includeInLayout properties to true, and then uses the Wipe effect to make the panel appear, as the following example shows:
 <s:transitions>
 	<s:Transition id="toOneOnly" fromState="*" toState="OneOnly">
 		<s:Sequence id="t1" targets="{[p2]}">
			<s:Wipe direction="left" duration="350"/>
 			<s:SetAction property="visible"/>
 			<s:SetAction target="{p2}" property="includeInLayout"/>
 		</Sequence>
 	</s:Transition>

 	<s:Transition id="toAnyFromAny" fromState="*" toState="*">
 		<s:Sequence id="t2" targets="{[p2]}">
 			<s:SetAction target="{p2}" property="includeInLayout"/>
 			<s:SetAction property="visible"/>
			<s:Wipe direction="left" duration="350"/>
 		</s:Sequence>
 	</s:Transition>
 </s:transitions>
In the toOneOnly transition, if you hide the target by setting its visible property to false, and then play the Iris effect, you would not see the Iris effect play because the target is already invisible.
To control the order of view state changes during a transition, Flex defines several action effects. The previous example uses the Spark SetAction action effect to control when to set the visible and includeInLayout properties in the transition. The following table describes the action effects:
|
Spark action effect |
MX action effect |
Corresponding view state class |
Use |
|---|---|---|---|
|
Sets a property value as part of a transition. |
|||
|
Sets a style to a value as part of a transition. |
|||
|
Adds a child as part of a transition. |
|||
|
Removes a child as part of a transition. |
It's best to use the Spark action effects instead of the MX action effects.
To control when a change defined by the view state property occurs in a transition, you use the corresponding action effect. The action effects give you control over the order of the state change.
In the previous example, you used the following statement to define an action effect to occur when the value of the visible property of a component changes:
<s:SetAction property="visible"/>
This action effect plays when the value of the visible property changes to either true or false. You can further control the effect using the value property of the <s:SetAction> tag, as the following example shows:
<s:SetAction property="visible" value="true"/>
In this example, you specify to play the effect only when the value of the visible property changes to true. Adding this type of information to the action effect can be useful if you want to use filters with your transitions. For more information, see Filtering effects.
The action effects do not support a duration property; they only perform the specified action.
Example: Using action effects
The following example shows the complete code for the example in Using action effects in a transition:
<?xml version="1.0" ?>
<!-- transitions\ActionTransitions.mxml -->
<s:Application xmlns:fx="http://ns.adobe.com/mxml/2009"
    xmlns:mx="library://ns.adobe.com/flex/mx"
    xmlns:s="library://ns.adobe.com/flex/spark">
    <s:layout>
        <s:VerticalLayout/>
    </s:layout>

    <!-- Define one view state, in addition to the base state.-->
    <s:states>
        <s:State name="default"/>
        <s:State name="OneOnly"/>
    </s:states>
    <!-- Define Transition array with one Transition object.-->
    <s:transitions>
        <s:Transition id="toOneOnly" fromState="*" toState="OneOnly">
            <s:Sequence id="t1" targets="{[p2]}">
                <s:Wipe direction="left" duration="350"/>
                <s:SetAction property="visible"/>
                <s:SetAction property="includeInLayout"/>
            </s:Sequence>
        </s:Transition>

        <s:Transition id="toAnyFromAny" fromState="*" toState="*">
            <s:Sequence id="t2" targets="{[p2]}">
                <s:SetAction property="includeInLayout"/>
                <s:SetAction property="visible"/>
                <s:Wipe direction="right" duration="350"/>
            </s:Sequence>
        </s:Transition>
    </s:transitions>

    <s:Panel id="p1" title="One"
        width="100" height="100">
        <s:Label fontSize="24" text="One"/>
    </s:Panel>

    <s:Panel id="p2" title="Two"
        width="100" height="100"
        visible="true" visible.OneOnly="false"
        includeInLayout="true" includeInLayout.OneOnly="false">
        <s:Label fontSize="24" text="Two"/>
    </s:Panel>

    <s:Button id="b1" label="Change state"
        click="currentState = currentState == 'OneOnly' ? '' : 'OneOnly';"/>
</s:Application>
Filtering effects
By default, Flex applies all of the effects defined in a transition to all of the target components of the transition. Therefore, in the following example, Flex applies the Move and Resize effects to all three targets:
 <s:Transition fromState="*" toState="*">
 	<!-- Define a Parallel effect as the top most effect.-->
 	<s:Parallel id="t1" targets="{[p1,p2,p3]}">
 		<!-- Define a Move and Resize effect.-->
 		<s:Move duration="400"/>
 		<s:Resize duration="400"/>
 	</s:Parallel>
 </s:Transition>
However, you might want to conditionalize an effect so that it does not apply to all target components, but only to a subset of the components. For example, you define an application with three view states, as the following image shows:
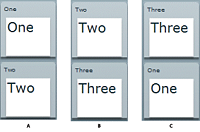
- A.
- Default view state
- B.
- Two view state
- C.
- Three view state
Each change of view state removes the top panel, moves the bottom panel to the top, and adds the next panel to the bottom of the screen. In this example, the third panel is invisible in the default view state.
For this example, you define a single transition that applies a Wipe effect to the top panel as it is removed, applies a Move effect to the bottom panel as it moves to the top position, and applies another Wipe effect to the panel being added to the bottom, as the following example shows:
 <s:transitions>
 	<s:Transition fromState="*" toState="*">
 		<s:Sequence targets="{[p1,p2,p3]}">
 			<s:Sequence id="sequence1" filter="hide">
 				<s:Wipe direction="up"/>
 				<s:SetPropertyAction name="visible" value="false"/>
 			</s:Sequence>
 			<s:Move filter="move"/>
 			<s:Sequence id="sequence2" filter="show">
 				<s:SetAction property="visible" value="true"/>
 				<s:Wipe direction="up"/>
 			</s:Sequence>
 		</s:Sequence>
 	</s:Transition>
 </s:transitions>
The sequence1 Sequence effect uses the filter property to specify the change that a component must go through in order for the effect to play on it. In this example, the sequence1 effect specifies a value of "hide" for the filter property. Therefore, the Wipe and SetAction effects only play on those components that change from visible to invisible by setting their visible property to false.
In the sequence2 Sequence effect, you set the filter property to show. Therefore, the Wipe and SetAction effects only play on those components whose state changes from invisible to visible by setting their visible property to true.
The Move effect also specifies a filter property with a value of move. Therefore, it applies to all target components that are changing position.
The following table describes the possible values of the filter property:
|
Value |
Description |
|---|---|
add |
Specifies to play the effect on all children added during the change of view state. |
hide |
Specifies to play the effect on all children whose visible property changes from true to false during the change of view state. |
move |
Specifies to play the effect on all children whose x or y properties change during the change of view state. |
remove |
Specifies to play the effect on all children removed during the change of view state. |
resize |
Specifies to play the effect on all children whose width or height properties change during the change of view state. |
show |
Specifies to play the effect on all children whose visible property changes from false to true during the change of view state. |
Example: Using a filter
The following example shows the complete code for the example in Filtering effects:
<?xml version="1.0" ?>
<!-- transitions\FilterShowHide.mxml -->
<s:Application xmlns:fx="http://ns.adobe.com/mxml/2009"
    xmlns:mx="library://ns.adobe.com/flex/mx"
    xmlns:s="library://ns.adobe.com/flex/spark" width="700" >

    <!-- Define two view state, in addition to the base state.-->
    <s:states>
        <s:State name="default"/>
        <s:State name="Two"/>
        <s:State name="Three"/>
    </s:states>

    <!-- Define a single transition for all state changes.-->
    <s:transitions>
        <s:Transition fromState="*" toState="*">
            <s:Sequence targets="{[p1,p2,p3]}">
                <s:Sequence id="sequence1" filter="hide" >
                    <s:Wipe direction="up"/>
                    <s:SetAction property="visible" value="false"/>
                </s:Sequence>
                <s:Move filter="move"/>
                <s:Sequence id="sequence2" filter="show" >
                    <s:SetAction property="visible" value="true"/>
                    <s:Wipe direction="up"/>
                </s:Sequence>
            </s:Sequence>
        </s:Transition>
    </s:transitions>

    <s:Group id="pm" width="100%" height="100%">
        <s:Panel id="p1" title="One"
                visible="true" visible.Two="false"
                x="0" y="0"
                x.Three="0" y.Three="110"
                width="100" height="100"
                click="currentState=''" >
            <s:Label fontSize="24" text="One"/>
        </s:Panel>

        <s:Panel id="p2" title="Two"
                visible="true" visible.Three="false"
                x="0" y="110"
                x.Two="0" y.Two="0"
                width="100" height="100"
                click="currentState='Two'" >
            <s:Label fontSize="24" text="Two"/>
        </s:Panel>

        <s:Panel id="p3" title="Three"
                visible="false" visible.Two="true" visible.Three="true"
                x.Two="0" y.Two="110"
                x.Three="0" y.Three="0"
                width="100" height="100"
                click="currentState='Three'" >
            <s:Label fontSize="24" text="Three"/>
        </s:Panel>
    </s:Group>
</s:Application>
Defining a custom filter
Flex lets you use the EffectTargetFilter class to define a custom filter that is executed by each transition effect on each target of the effect. By defining a custom filter, you can specify your own logic for controlling a transition. The following table describes the properties of the EffectTargetFilter class:
|
Property |
Description |
|---|---|
filterProperties |
An Array of Strings specifying component properties. If any of the properties in the Array have changed on the target component, play the effect on the target. |
filterStyles |
An Array of Strings specifying style properties. If any of the style properties in the Array have changed on the target component, play the effect on the target. |
filterFunction |
A property containing a reference to a callback function that defines custom filter logic. Flex calls this method on every target of the effect. If the function returns true, the effect plays on the target; if it returns false, the target is skipped by that effect. |
requiredSemantics |
A collection of properties and associated values which must be associated with a target for the effect to be played. |
The callback function specified by the filterFunction property has the following signature:
 filterFunc(propChanges:Array, instanceTarget:Object):Boolean {
 	// Return true to play the effect on instanceTarget,
 	// or false to not play the effect.
 }
The function takes the following arguments:
- propChanges
-
An Array of PropertyChanges objects, one object per target component of the effect. If a property of a target is not modified by the transition, it is not included in this Array.
- instanceTarget
-
The specific target component of the effect that you filter.
For an example using a custom filter function, see Example: Using a custom effect filter.
The following example defines a custom filter that specifies to play the effect only on a target component whose x or width property is modified as part of the change of view state:
<?xml version="1.0" ?>
<!-- transitions\EffectFilterExampleMXML.mxml -->
<s:Application xmlns:fx="http://ns.adobe.com/mxml/2009"
    xmlns:mx="library://ns.adobe.com/flex/mx"
    xmlns:s="library://ns.adobe.com/flex/spark"
    width="700">

    <!-- Define the two view states, in addition to the base state.-->
    <s:states>
        <s:State name="default"/>
        <s:State name="One"/>
        <s:State name="Two"/>
    </s:states>

    <s:transitions>
        <s:Transition fromState="*" toState="*">
            <s:Sequence id="t1" targets="{[p1,p2,p3]}">
                <mx:Blur id="myBlur" duration="100" blurXFrom="0.0"
                    blurXTo="10.0" blurYFrom="0.0" blurYTo="10.0">
                    <!-- Define the custom filter. -->
                    <mx:customFilter>
                        <mx:EffectTargetFilter
                            filterProperties="['width','x']"/>
                    </mx:customFilter>
                </mx:Blur>
                <s:Parallel>
                    <s:Move  duration="400"/>
                    <s:Resize duration="400"/>
                </s:Parallel>
                <mx:Blur id="myUnBlur" duration="100" blurXFrom="10.0"
                    blurXTo="0.0" blurYFrom="10.0" blurYTo="0.0">
                    <!-- Define the custom filter. -->
                    <mx:customFilter>
                        <mx:EffectTargetFilter
                            filterProperties="['width','x']"/>
                    </mx:customFilter>
                </mx:Blur>
            </s:Sequence>
        </s:Transition>
    </s:transitions>

    <!-- Define the container holding the three Panel containers.-->
    <s:Group id="pm" width="100%" height="100%">
        <s:Panel id="p1" title="One"
                x="0" y="0"
                x.One="110" y.One="0"
                x.Two="0" y.Two="0"
                width="100" height="100"
                width.One="200" height.One="210"
                width.Two="100" height.Two="100"
                click="currentState='One'">
            <s:Label fontSize="24" text="One"/>
        </s:Panel>

        <s:Panel id="p2" title="Two"
                x="0" y="110"
                x.One="0" y.One="0"
                x.Two="110" y.Two="0"
                width="100" height="100"
                width.One="100" height.One="100"
                width.Two="200" height.Two="210"
                click="currentState='Two'">
            <s:Label fontSize="24" text="Two"/>
        </s:Panel>

        <s:Panel id="p3" title="Three"
                x="110" y="0"
                x.One="0" y.One="110"
                x.Two="0" y.Two="110"
                width="200" height="210"
                width.One="100" height.One="100"
                width.Two="100" height.Two="100"
                click="currentState='default'">
            <s:Label fontSize="24" text="Three"/>
        </s:Panel>
    </s:Group>
</s:Application>
Writing a filter function
To create a filter function, you define an EffectTargetFilter object, and then specify that object as the value of the Effect.customFilter property for an effect. The following example uses the creationComplete event of an application to initialize an EffectTargetFilter object, and then specify it as the value of the customFilter property for two Blur effects:
 <s:Application xmlns:fx="http://ns.adobe.com/mxml/2009"
	xmlns:mx="library://ns.adobe.com/flex/mx"
	xmlns:s="library://ns.adobe.com/flex/spark"
	creationComplete="initFilter(event);" width="700">

 	<fx:Script>
 		<![CDATA[

 			import mx.effects.EffectTargetFilter;
 			import flash.events.Event;

 			// This function returns true for the Panel moving to x=110.
 			public function filterFunc(propChanges:Array,instanceTarget:Object):Boolean
 			{
 				...
 			}

 			// Define the EffectTargetFilter object.
 			private var myBlurFilter:EffectTargetFilter;

 			// Initialize the EffectTargetFilter object, and set the
 			// customFilter property for two Blur effects.
 			private function initFilter(event:Event):void {
 				myBlurFilter = new EffectTargetFilter();

 				myBlurFilter.filterFunction=filterFunc;

 				myBlur.customFilter=myBlurFilter;
 				myUnBlur.customFilter=myBlurFilter;
 			}

 		]]>
 	</Script>

 	<s:transitions>
 		<s:Transition fromState="*" toState="*">
 			<s:Sequence id="t1" targets="{[p1,p2,p3]}">
 				<mx:Blur id="myBlur"/>
 					<s:Parallel>
 						<s:Move duration="400"/>
 						<s:Resize duration="400"/>
 					</Parallel>
 				<mx:Blur id="myUnBlur"/>
 			</s:Sequence>
 		</s:Transition>
 	</s:transitions>

 	...

 </s:Application>
The propChanges argument passed to the filter function contains an Array of PropertyChanges objects, one object per target component of the effect. The following table describes the properties of the PropertyChanges class:
|
Property |
Description |
|---|---|
target |
A target component of the effect. The end and start properties of the PropertyChanges class define how the target component is modified by the change to the view state. |
start |
An Object that contains the starting properties of the target component, as defined by the current view state. For example, for a target component that is both moved and resized by a change to the view state, the start property contains the starting position and size of the component, as the following example shows: {x:00, y:00, width:100, height:100}
|
end |
An Object that contains the ending properties of the target component, as defined by the destination view state. For example, for a target component that is both moved and resized by a change to the view state, the end property contains the ending position and size of the component, as the following example shows: {x:100, y:100, width:200, height:200}
|
Within the custom filter function, you first search the propChanges Array for the PropertyChanges object that matches the instanceTarget argument by comparing the instanceTarget argument to the propChanges.target property.
The following filter function examines the propChanges Array to determine if it should play the effect on the instanceTarget. In this example, the filter function returns true only for those components being moved to a position where the translationX property equals 110, as the following example shows:
 // This function returns true for a target moving to x=110.
 public function filterFunc(propChanges:Array, instanceTarget:Object):Boolean 		{

 	// Determine the length of the propChanges Array.
 	for (var i:uint=0; i < propChanges.length; i++)
 	{
 		// Determine the Array element that matches the effect target.
 		if (propChanges[i].target == instanceTarget)
 		{
 			// Check to see if the end Object contains a value for x.
 			if (propChanges[i].end["translationX"] != undefined)
 			{
 				// Return true of the end value for x is 110.
 				return (propChanges[i].end.translationX == 110);
 			}
 		}
 	}
 	// Otherwise, return false.
 	return false;
 }
Example: Using a custom effect filter
In the following example, you use a custom filter function to apply Blur effects to one of the three targets of a transition. The other two targets are not modified by the Blur effects.
To determine the target of the Blur effects, the custom filter function examines the translationX property of each target. The Blur effects play only on the component moving to x=110, as the following example shows:
<?xml version="1.0" ?>
<!-- transitions\EffectFilterExample.mxml -->
<s:Application xmlns:fx="http://ns.adobe.com/mxml/2009"
    xmlns:mx="library://ns.adobe.com/flex/mx"
    xmlns:s="library://ns.adobe.com/flex/spark"
    creationComplete="initFilter(event);"
    width="700">

    <fx:Script>
        <![CDATA[
            import mx.effects.EffectTargetFilter;
            import flash.events.Event;

            // This function returns true for the Panel moving to x=110.
            public function filterFunc(propChanges:Array,
                    instanceTarget:Object):Boolean {
                // Determine the length of the propChanges Array.
                for (var i:uint=0; i < propChanges.length; i++)
                {
                    // Determine the Array element
                    // that matches the effect target.
                    if (propChanges[i].target == instanceTarget)
                    {
                        // Check whether the end Object contains
                        // a value for x.
                        if (propChanges[i].end["translationX"] != undefined)
                        {
                            // Return true if the end value for x is 110.
                            return (propChanges[i].end.translationX == 110);
                        }
                    }
                }

                return false;
            }

            // Define the EffectTargetFilter object.
            private var myBlurFilter:EffectTargetFilter;

            // Initialize the EffectTargetFilter object, and set the
            // customFilter property for two Blur effects.
            private function initFilter(event:Event):void {
                myBlurFilter = new EffectTargetFilter();

                myBlurFilter.filterFunction=filterFunc;

                myBlur.customFilter=myBlurFilter;
                myUnBlur.customFilter=myBlurFilter;
            }
          ]]>
    </fx:Script>

    <!-- Define the two view states, in addition to the base state.-->
    <s:states>
        <s:State name="default"/>
        <s:State name="One"/>
        <s:State name="Two"/>
    </s:states>

    <s:transitions>
        <s:Transition fromState="*" toState="*">
            <s:Sequence id="t1" targets="{[p1,p2,p3]}">
                <mx:Blur id="myBlur" duration="100" blurXFrom="0.0"
                    blurXTo="10.0" blurYFrom="0.0" blurYTo="10.0"/>
                <s:Parallel>
                    <s:Move  duration="400"/>
                    <s:Resize duration="400"/>
                </s:Parallel>
                <mx:Blur id="myUnBlur" duration="100" blurXFrom="10.0"
                    blurXTo="0.0" blurYFrom="10.0" blurYTo="0.0"/>
            </s:Sequence>
        </s:Transition>
    </s:transitions>
    <!-- Define the container holding the three Panel containers.-->
    <s:Group id="pm" width="100%" height="100%">
        <s:Panel id="p1" title="One"
                x="0" y="0"
                x.One="110" y.One="0"
                x.Two="0" y.Two="0"
                width="100" height="100"
                width.One="200" height.One="210"
                width.Two="100" height.Two="100"
                click="currentState='One'">
            <s:Label fontSize="24" text="One"/>
        </s:Panel>

        <s:Panel id="p2" title="Two"
                x="0" y="110"
                x.One="0" y.One="0"
                x.Two="110" y.Two="0"
                width="100" height="100"
                width.One="100" height.One="100"
                width.Two="200" height.Two="210"
                click="currentState='Two'">
            <s:Label fontSize="24" text="Two"/>
        </s:Panel>

        <s:Panel id="p3" title="Three"
                x="110" y="0"
                x.One="0" y.One="110"
                x.Two="0" y.Two="110"
                width="200" height="210"
                width.One="100" height.One="100"
                width.Two="100" height.Two="100"
                click="currentState='default'">
            <s:Label fontSize="24" text="Three"/>
        </s:Panel>
    </s:Group>
</s:Application>
Using the requiredSemantics property
When working with data effects, you can use the EffectTargetFiler.requiredSemantics property to filter effects. If you want to play a data effect on all targets of a list control that are not added by the effect, meaning targets that are removed, replaced, moved, or affected in any other way, you can write the effect definition as shown below:
 <mx:Blur>
 	<mx:customFilter>
 		<mx:EffectTargetFilter requiredSemantics="{{'added':false}}"/>
 	</mx:customFilter>
 </mx:Blur>
To play a data effect on all targets that are not added or not removed by the effect, you can write the effect definition as shown below:
 <mx:Blur>
 	<mx:customFilter>
 		<mx:EffectTargetFilter requiredSemantics="{{'added':false}, {'removed':false}}"/>
 	</mx:customFilter>
 </mx:Blur>
The allowed list of properties that you can specify includes added, removed, replaced, and replacement. The allowed values for the properties are true and false.
For more information on data effects, see Using MX data effects.
Transition tips and troubleshooting
Tips
Determine the type of transition you are defining:
-
With dynamic transitions, you know what effects you want to play, but not which targets they will play on.
-
With explicit transitions, you know exactly what happens to each individual target.
Complex transitions may consist of both dynamic and explicit elements.
Tips for dynamic transitions:
-
List all possible targets in the parent composite effect.
-
By default, all effects play on all specified targets. Use filtering with dynamic transitions to limit the target set.
-
Dynamic transitions can be used with a wide variety of state changes.
Tips for explicit transitions:
-
Specify targets on the child effects, or on a composite effect when all child effects of the composite effect have the same targets.
-
By default, all effects play on all specified targets. For explicit transitions, make sure the targets are correctly set.
-
Explicit transitions typically require a different transition for each change to the view state.
Troubleshooting
Troubleshooting a transition effect that does not play:
-
Is the effect target being hidden or removed? If so, make sure you add an <RemoveChild> property to the view state definition, or an <s:SetPropertyAction name="visible"> tag in the transition definition.
-
Does the change to the view state define settings that pertain to the transition effect? For example, if you have a Resize effect, you must change the width or height property of the target when the view state changes to trigger the effect.
-
Check that you specified the correct targets to the transition.
-
Check that your filter settings on the effect and on any parent effect are not excluding the target.
Troubleshooting an effect playing on too many targets:
-
Add a filter for a dynamic transition, or change the targets for an explicit transition.
Troubleshooting wrong effect parameters:
-
Did you specify explicit parameters on the effect? Are they correct?
-
Ensure that you correctly set the showTarget property for mask effects such as the Iris effect, and the wipe effects.
Troubleshooting a flickering or flashing target:
-
Ensure that you correctly set the showTarget property for mask effects such as the Iris effect, and the wipe effects.
-
Is the effect target being hidden or removed? If so, make sure you add an <RemoveChild> property to the view state definition to remove the target, or an <SetPropertyAction name="visible"> tag in the transition definition to hide the target.
Troubleshooting when an application does not look correct after a transition:
-
Some effects leave the target with changed properties. For example, a Fade effect leaves the alpha property of the target at the alphaTo value specified to the effect. If you use the Fade effect on a target that sets alpha property to zero, you must set the alpha property to a nonzero value before the object appears again.
-
Try removing one effect at a time from the transition until it no longer leaves your application with the incorrect appearance.
Navigation
Adobe and Adobe Flash Platform are either registered trademarks or trademarks of Adobe Systems Incorporated in the United States and/or other countries and are used by permission from Adobe. No other license to the Adobe trademarks are granted.